728x90

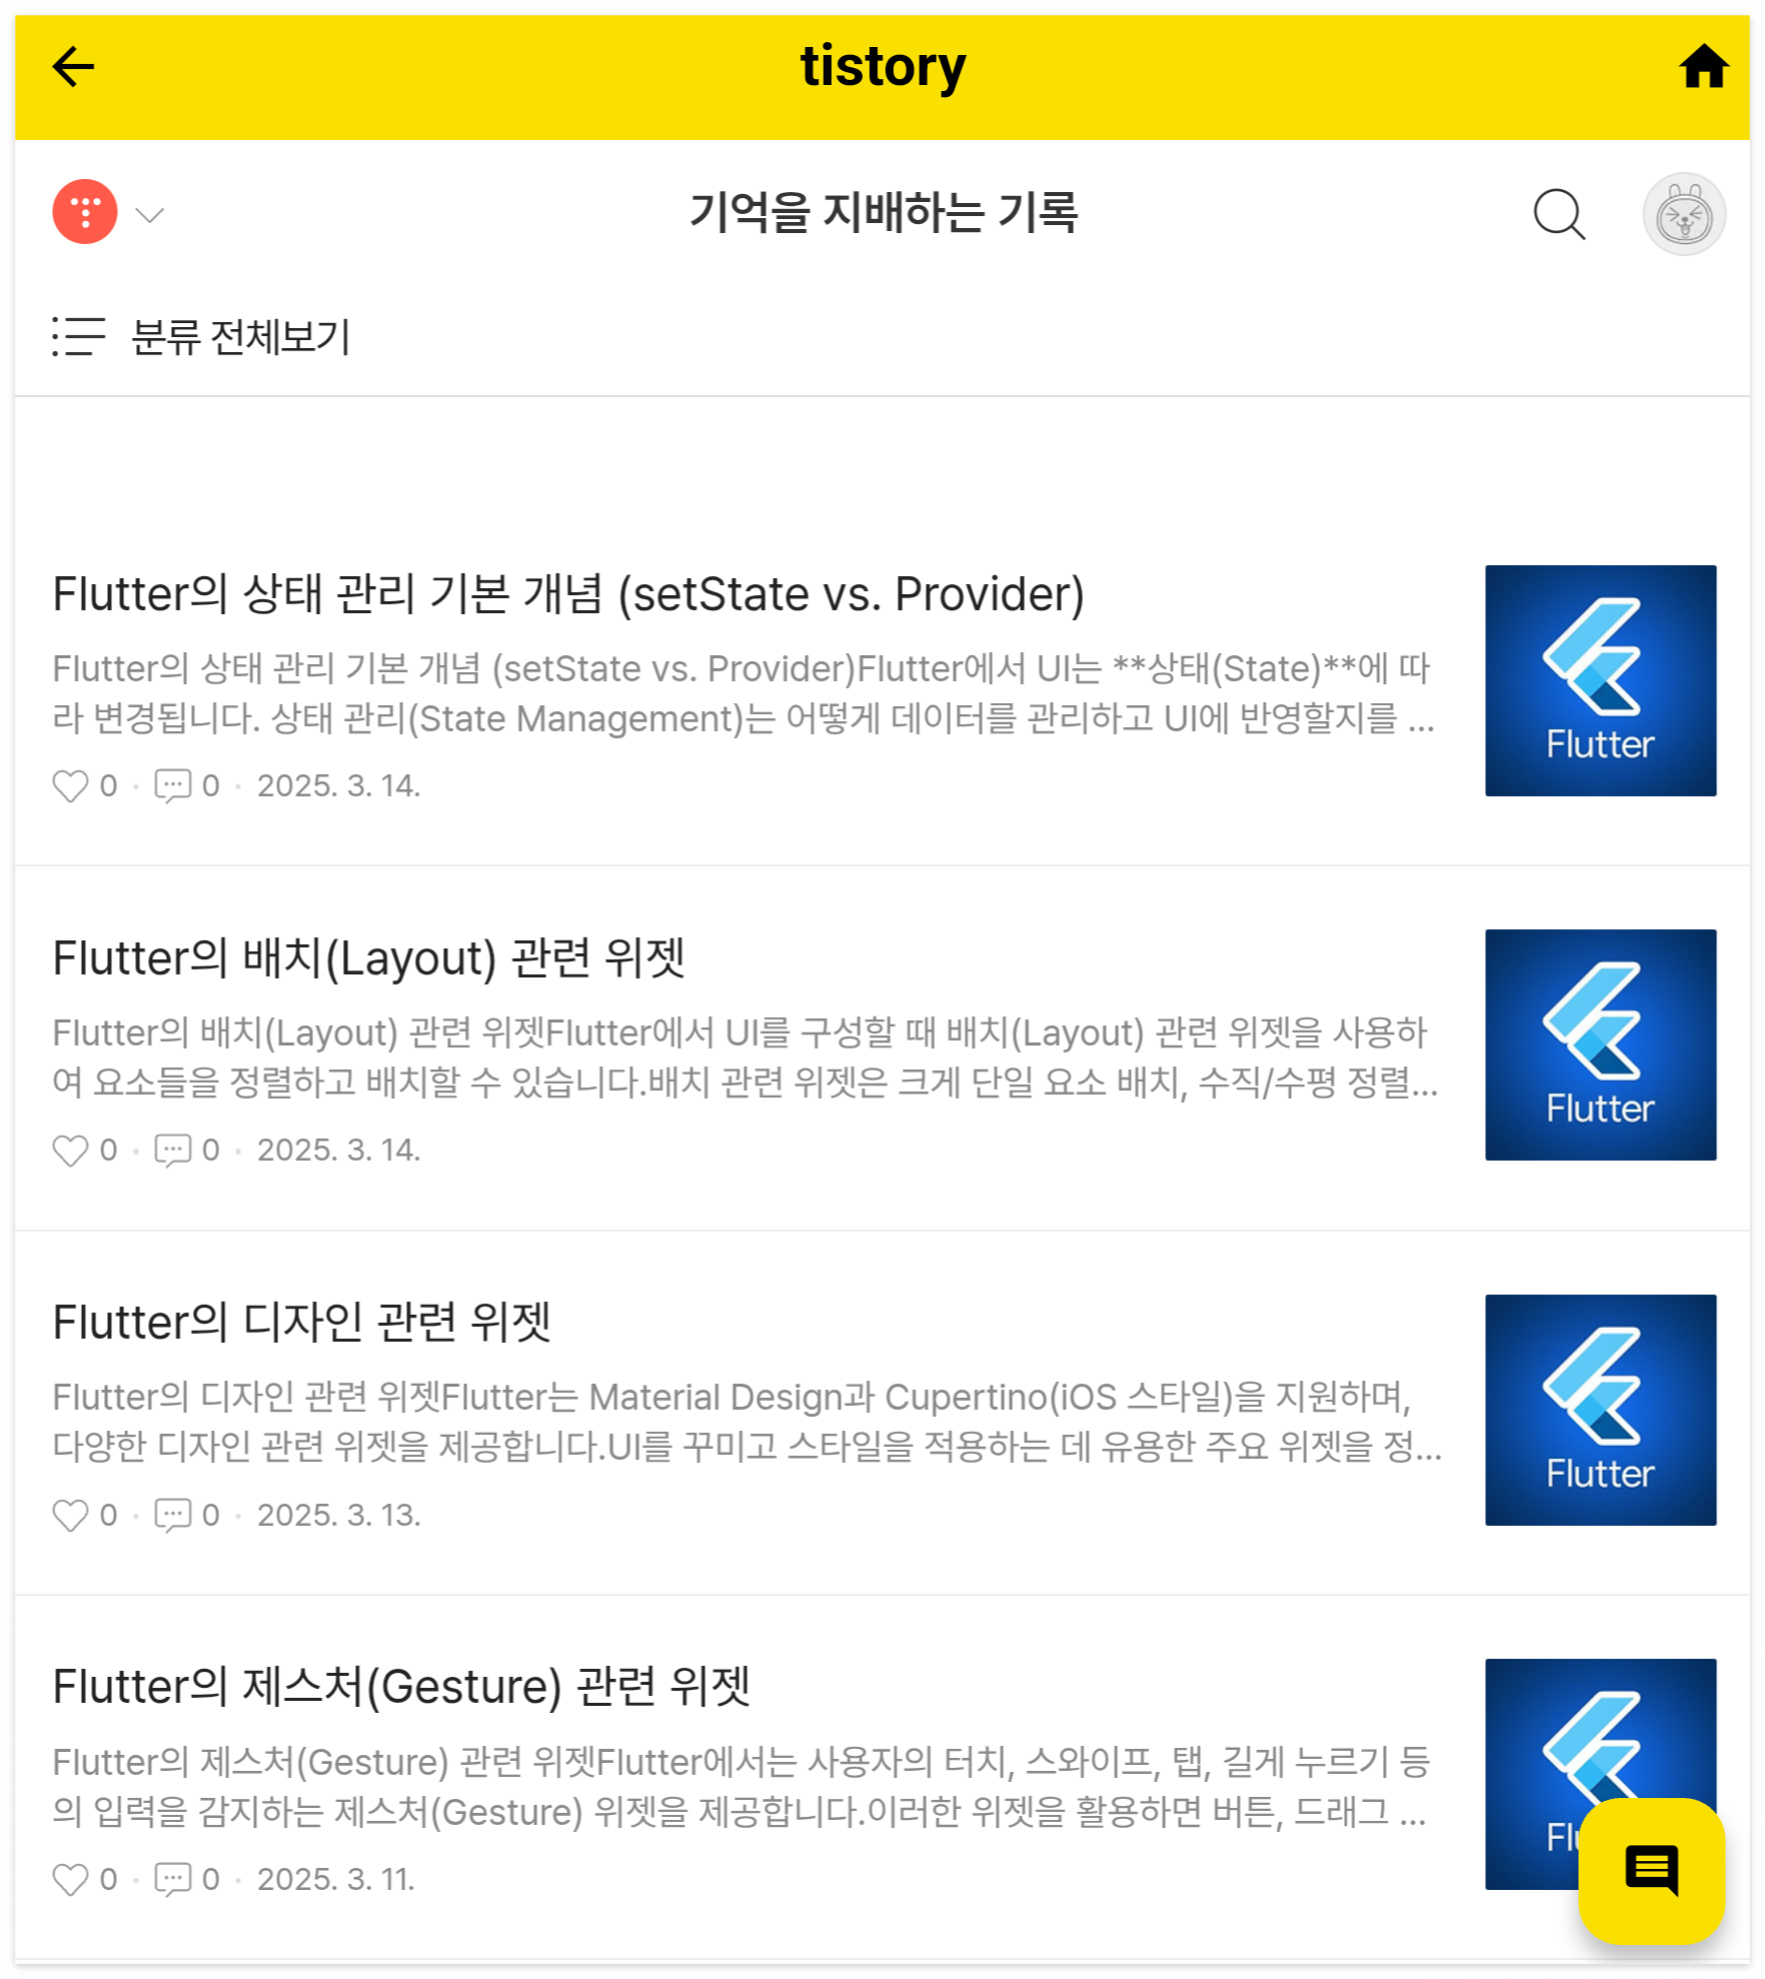
블로그앱 구성
- 상단 Appbar의 타이틀 "tistory", 색상은 f9e000, 굵은 글씨, 중앙정렬
- Appbar 우측에 '홈' 버튼 생성, 클릭하면 'https://bigdown.tistory.com/' 로 이동
- AppBar 좌측에 뒤로가기 버튼을 추가하여 웹 브라우저의 뒤로 가기 기능을 수행
- 스마트폰의 뒤로 가기 버튼을 누르면 이전 페이지로 이동하도록 WillPopScope을 활용하여 처리
- Webview에서는 'https://bigdown.tistory.com/' 로 접속, 자바스크립트 등의 기능 활성화
- Webview 좌측 하단에 '방명록' 플로팅 버튼을 추가하고 클릭하면 'https://bigdown.tistory.com/guestbook'으로 이동
pubspec.yam에 'webview_flutter' 플러그인 설치하기
dependencies:
  flutter:
    sdk: flutter

  # The following adds the Cupertino Icons font to your application.
  # Use with the CupertinoIcons class for iOS style icons.
  cupertino_icons: ^1.0.8
webview_flutter: 4.10.0- 설정 변경후 'flutter pub get' 을 실행하여 플러그인을 설치합니다.
전체 코드
import 'package:flutter/material.dart';
import 'package:webview_flutter/webview_flutter.dart';

void main() {
  runApp(const MyApp());
}

class MyApp extends StatelessWidget {
  const MyApp({super.key});

  @override
  Widget build(BuildContext context) {
    return MaterialApp(
      debugShowCheckedModeBanner: false,
      home: const WebViewScreen(),
    );
  }
}

class WebViewScreen extends StatefulWidget {
  const WebViewScreen({super.key});

  @override
  _WebViewScreenState createState() => _WebViewScreenState();
}

class _WebViewScreenState extends State<WebViewScreen> {
  late final WebViewController _controller;

  @override
  void initState() {
    super.initState();
    _controller = WebViewController()
      ..setJavaScriptMode(JavaScriptMode.unrestricted)
      ..setBackgroundColor(const Color(0xFFFFFFFF))
      ..setNavigationDelegate(
        NavigationDelegate(
          onPageStarted: (String url) {},
          onPageFinished: (String url) {},
        ),
      )
      ..loadRequest(Uri.parse('https://bigdown.tistory.com/'));
  }

  void _goHome() {
    _controller.loadRequest(Uri.parse('https://bigdown.tistory.com/'));
  }

  void _goGuestbook() {
    _controller.loadRequest(Uri.parse('https://bigdown.tistory.com/guestbook'));
  }

  Future<void> _goBack() async {
    if (await _controller.canGoBack()) {
      await _controller.goBack();
    }
  }

  @override
  Widget build(BuildContext context) {
    return PopScope(
      canPop: false,
      onPopInvokedWithResult: (didPop, result) async {
        if (!didPop && await _controller.canGoBack()) {
          _controller.goBack();
        } else {
          Navigator.of(context).maybePop(result);
        }
      },
      child: Scaffold(
        appBar: AppBar(
          title: const Text(
            'tistory',
            style: TextStyle(color: Colors.black, fontWeight: FontWeight.bold),
          ),
          centerTitle: true,
          backgroundColor: const Color(0xFFF9E000),
          leading: IconButton(
            icon: const Icon(Icons.arrow_back, color: Colors.black),
            onPressed: _goBack,
          ),
          actions: [
            IconButton(
              icon: const Icon(Icons.home, color: Colors.black),
              onPressed: _goHome,
            ),
          ],
        ),
        body: WebViewWidget(controller: _controller),
        floatingActionButton: FloatingGuestBookButton(onPressed: _goGuestbook),
      ),
    );
  }
}

class FloatingGuestBookButton extends StatelessWidget {
  final VoidCallback onPressed;

  const FloatingGuestBookButton({super.key, required this.onPressed});

  @override
  Widget build(BuildContext context) {
    return FloatingActionButton(
      onPressed: onPressed,
      backgroundColor: const Color(0xFFF9E000),
      child: const Icon(Icons.comment, color: Colors.black),
    );
  }
}
728x90
코드 상세 설명
import 'package:flutter/material.dart';
import 'package:webview_flutter/webview_flutter.dart';- flutter/material.dart: Flutter의 UI 구성 요소를 포함하는 패키지
- webview_flutter/webview_flutter.dart: WebView 관련 기능을 제공하는 패키지
1. 애플리케이션 실행
void main() {
  runApp(const MyApp());
}
- main() 함수에서 MyApp 클래스를 실행하여 앱을 시작합니다.
class MyApp extends StatelessWidget {
  const MyApp({super.key});

  @override
  Widget build(BuildContext context) {
    return MaterialApp(
      debugShowCheckedModeBanner: false,
      home: const WebViewScreen(),
    );
  }
}
- MyApp은 StatelessWidget을 상속받아 앱의 루트 위젯 역할을 합니다.
- MaterialApp을 반환하며, debugShowCheckedModeBanner: false로 설정해 디버그 배너를 제거했습니다.
- home: const WebViewScreen()으로 WebViewScreen을 초기 화면으로 설정했습니다.
2. WebView 화면 (WebViewScreen)
class WebViewScreen extends StatefulWidget {
  const WebViewScreen({super.key});

  @override
  _WebViewScreenState createState() => _WebViewScreenState();
}
- WebViewScreen은 StatefulWidget으로 정의되어 상태를 관리할 수 있습니다.
- createState()를 통해 _WebViewScreenState를 생성하여 상태 관리.
(1) 상태 변수 선언
class _WebViewScreenState extends State<WebViewScreen> {
  late final WebViewController _controller;
- WebViewController를 late 키워드를 이용하여 선언했습니다.
- late를 사용한 이유: WebView 컨트롤러는 initState()에서 초기화되므로, late를 사용해 초기화 전에는 메모리를 할당하지 않도록 함.
(2) WebViewController 초기화
  @override
  void initState() {
    super.initState();
    _controller = WebViewController()
      ..setJavaScriptMode(JavaScriptMode.unrestricted)
      ..setBackgroundColor(const Color(0xFFFFFFFF))
      ..setNavigationDelegate(
        NavigationDelegate(
          onPageStarted: (String url) {},
          onPageFinished: (String url) {},
        ),
      )
      ..loadRequest(Uri.parse('https://bigdown.tistory.com/'));
  }
- JavaScriptMode.unrestricted: JavaScript 실행을 허용
- setBackgroundColor(const Color(0xFFFFFFFF)): **배경색을 흰색(0xFFFFFFFF)**으로 설정
- setNavigationDelegate: 페이지 이동 관련 이벤트를 처리하는 콜백 함수
- loadRequest(Uri.parse('https://bigdown.tistory.com/')): 초기 웹페이지를 Tistory 블로그로 설정
3. 뒤로 가기 & 홈 버튼 기능 추가
(1) 홈으로 이동하는 함수
  void _goHome() {
    _controller.loadRequest(Uri.parse('https://bigdown.tistory.com/'));
}- loadRequest() 메서드를 사용하여 홈 URL을 다시 로드합니다.
(2) 뒤로 가기 기능
  Future<void> _goBack() async {
    if (await _controller.canGoBack()) {
      await _controller.goBack();
    }
}- _controller.canGoBack()을 통해 뒤로 갈 수 있는지 여부를 확인
- 가능하면 _controller.goBack()을 실행하여 이전 페이지로 이동
4. UI 구성 (AppBar + WebView + FloatingActionButton)
return PopScope(
  canPop: false,
  onPopInvokedWithResult: (didPop, result) async {
    if (!didPop && await _controller.canGoBack()) {
      _controller.goBack();
    } else {
      Navigator.of(context).maybePop(result);
    }
},- Flutter 3.22 이후 뒤로 가기 동작을 커스터마이징하기 위해 사용되는 PopScope 위젯입니다. 이전에는 WillPopScope를 사용했지만, predictive back navigation(예측 가능한 뒤로가기) 지원을 위해 PopScope이 도입되었고, 최근에는 onPopInvokedWithResult로 업그레이드된 상태입니다.
- PopScope는 사용자 또는 시스템(뒤로 가기 버튼 등)이 현재 라우트를 종료(pop) 하려고 할 때, 그 동작을 가로채서 커스터마이징할 수 있게 해줍니다.
      child: Scaffold(
        appBar: AppBar(
          title: const Text(
            'tistory',
            style: TextStyle(color: Colors.black, fontWeight: FontWeight.bold),
          ),
          centerTitle: true,
          backgroundColor: const Color(0xFFF9E000),
          leading: IconButton(
            icon: const Icon(Icons.arrow_back, color: Colors.black),
            onPressed: _goBack,
          ),
          actions: [
            IconButton(
              icon: const Icon(Icons.home, color: Colors.black),
              onPressed: _goHome,
            ),
          ],
        ),
- title: "tistory" 텍스트를 중앙 정렬 & 굵게 표시
- backgroundColor: 노란색(0xFFF9E000)
- leading: 좌측 뒤로 가기 버튼 추가 (_goBack() 호출)
- actions: 우측 홈 버튼 추가 (_goHome() 호출)
body: WebViewWidget(controller: _controller),
- WebViewWidget(controller: _controller): WebView를 표시
5. FloatingActionButton (방명록 페이지 이동)
floatingActionButton: FloatingGuestBookButton(onPressed: _goGuestbook),- floatingActionButton: FloatingGuestBookButton 위젯을 사용하여 우측 하단에 방명록 이동 버튼 추가
- _goGuestbook()을 클릭하면 방명록 페이지(https://bigdown.tistory.com/guestbook)로 이동
6. 방명록 이동 버튼 (FloatingGuestBookButton)
class FloatingGuestBookButton extends StatelessWidget {
  final VoidCallback onPressed;

  const FloatingGuestBookButton({super.key, required this.onPressed});

  @override
  Widget build(BuildContext context) {
    return FloatingActionButton(
      onPressed: onPressed,
      backgroundColor: const Color(0xFFF9E000),
      child: const Icon(Icons.comment, color: Colors.black),
    );
  }
}
- FloatingGuestBookButton 클래스를 별도로 정의하여 객체지향적으로 분리
- onPressed: 버튼 클릭 시 실행할 함수 (_goGuestbook을 전달받음)
- backgroundColor: 노란색(0xFFF9E000)
- child: 아이콘(Icons.comment)
WebViewController 사용을 위한 설정 방법
Flutter에서 WebViewController를 이용한 webview_flutter 패키지를 사용할 때, Android와 iOS에서 정상적으로 작동하려면 몇 가지 권한 및 설정 파일을 수정해야 합니다.
1. Android 설정
1.1. AndroidManifest.xml 설정
android/app/src/main/AndroidManifest.xml 에 필요한 권한 추가
<manifest xmlns:android="http://schemas.android.com/apk/res/android"
    package="com.example.myapp">

    <!-- 인터넷 접근 권한 -->
    <uses-permission android:name="android.permission.INTERNET"/>

    <!-- 네트워크 상태 확인 권한 (필요 시) -->
    <uses-permission android:name="android.permission.ACCESS_NETWORK_STATE"/>

    <application
        android:usesCleartextTraffic="true"
        android:networkSecurityConfig="@xml/network_security_config"
        android:requestLegacyExternalStorage="true">

        <!-- WebView 구성 -->
        <meta-data
            android:name="android.webkit.WebView.EnableSafeBrowsing"
            android:value="false"/>

        ...
    </application>

</manifest>- 인터넷 사용 권한 (android.permission.INTERNET)
- WebView가 인터넷을 통해 외부 웹페이지를 로드할 수 있도록 설정합니다.
- 네트워크 상태 확인 권한 (android.permission.ACCESS_NETWORK_STATE)
- 네트워크 연결 상태를 확인할 수 있도록 설정 (필수는 아님).
- android:usesCleartextTraffic="true"
- HTTP (비보안) 요청을 허용하려면 필요합니다.
(https만 사용하면 필요 없음)
- HTTP (비보안) 요청을 허용하려면 필요합니다.
- android:requestLegacyExternalStorage="true"
- 앱에서 로컬 파일 저장 및 로드 기능을 활용할 경우 필요.
- android.webkit.WebView.EnableSafeBrowsing
- false로 설정하면 안전한 브라우징 필터링을 비활성화 (일부 웹페이지 차단 방지).
2. iOS 설정
2.1. WebView 사용 권한 설정
ios/Runner/Info.plist 네트워크 및 WebView 사용 권한 추가
<key>NSAppTransportSecurity</key>
<dict>
    <key>NSAllowsArbitraryLoads</key>
    <true/>
</dict>

<key>NSAllowsLocalNetworking</key>
<true/>

<key>NSBluetoothAlwaysUsageDescription</key>
<string>이 앱은 Bluetooth를 사용하여 WebView 기능을 제공합니다.</string>

<key>NSCameraUsageDescription</key>
<string>이 앱은 카메라 액세스를 요청합니다.</string>

<key>NSMicrophoneUsageDescription</key>
<string>이 앱은 마이크 액세스를 요청합니다.</string>
- NSAllowsArbitraryLoads
- true로 설정하면 HTTP 요청이 허용됩니다.
- HTTPS가 기본이지만, HTTP 페이지도 허용하려면 필요.
- NSAllowsLocalNetworking
- 로컬 네트워크 통신을 허용합니다.
- NSBluetoothAlwaysUsageDescription
- WebView가 Bluetooth 기능을 사용할 경우 필요.
- NSCameraUsageDescription / NSMicrophoneUsageDescription
- 웹사이트에서 카메라 및 마이크 액세스를 요청할 경우 필요한 설정.
728x90
'Flutter for Beginners' 카테고리의 다른 글
| Flutter 디지털 시계 + 나침반 + 날씨정보 (0) | 2025.03.25 |
|---|---|
| Flutter PageView을 이용한 자동 슬라이드 이미지 겔러리 (0) | 2025.03.24 |
| Flutter의 상태 관리 기본 개념 (setState vs. Provider) (0) | 2025.03.14 |
| Flutter의 배치(Layout) 관련 위젯 (0) | 2025.03.14 |
| Flutter의 디자인 관련 위젯 (0) | 2025.03.13 |


